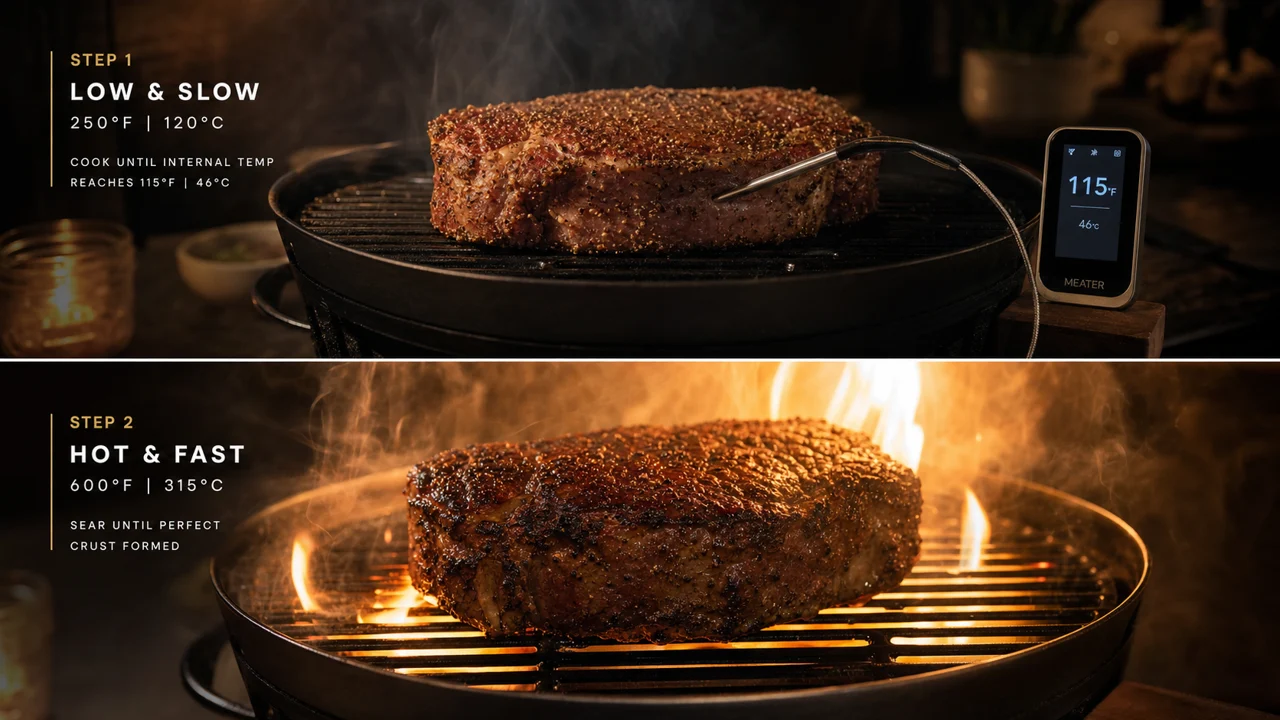
The reverse sear inverts the classic order of operations in steak cookery with a logic that, once understood, makes the traditional sequence seem arbitrary. Instead of searing first to build a crust and then finishing in the oven, you cook the steak slowly in a low-temperature oven — or smoker — to within a few degrees of the target internal temperature, allow the surface to desiccate during a brief rest, and then sear blazing hot at the very end. For thick cuts — anything over 2.5–3 cm — it is among the most reliable and repeatable methods available to any cook, combining the edge-to-edge doneness control of sous vide with a surface-drying advantage that the oven provides, delivering a crust of unusual depth and evenness. It requires no specialized equipment beyond an oven, a probe thermometer, and a cast-iron or carbon-steel pan — which makes it the most accessible high-performance steak technique in existence.
The Structural Problem with Sear-Then-Roast
The traditional sequence — hot sear to build crust, then oven to finish — has a fundamental structural flaw that becomes painfully visible at thicknesses above 3 cm. The moment the steak enters the oven after searing, the outer layers are already at 70–80°C or higher. The oven then continues to drive heat inward. As the center slowly rises toward target temperature, the outer zones continue cooking: they cannot stop, because they are surrounded by a 180–200°C environment and the thermal gradient established during the sear continues to equalize. The grey-band result is not a cooking error — it is a physics inevitability of the method. On a 4 cm steak, the grey overcooked band can extend 1–1.5 cm inward from each surface, leaving only a narrow core of the intended doneness. You pay for the full thickness and eat the fraction in the center.
Reversing the sequence eliminates this problem structurally. The slow, low-oven phase brings the entire steak to within a narrow, uniform temperature band of the target — without any surface overcooking, because the oven temperature (100–120°C) is not dramatically higher than the target internal temperature. The thermal gradient is very gentle. When the steak comes out of the oven and enters the rest phase, its entire cross-section is at 47–49°C for a medium-rare target — edge to edge, uniformly. When it then hits the searing pan, only the surface is exposed to extreme heat, and for a very brief time. There is almost nothing to overcook, because the entire interior is already at temperature.
Pro tip: Reverse sear gives you nearly the same edge-to-edge doneness as sous vide with none of the equipment. What it adds that sous vide cannot: a surface that has been progressively drying for 25–35 minutes in a low oven — drier than anything you can achieve by patting alone, and drier than a sous-vide bag surface by a significant margin.
Step-by-Step Protocol
The method is specific but not complicated. Precision in a few key steps makes the difference between excellent and merely good results.
- Salt generously and advance-rest. Ideally 24–48 hours ahead, salted on all surfaces and left uncovered on a wire rack in the refrigerator. The minimum is salting immediately before the oven if time is short — but the overnight rest produces measurably better surface development and interior seasoning.
- Set the oven to 100–120°C, conventional heat. Fan-assisted (convection) mode increases evaporation at the surface and can dry some zones unevenly; conventional radiation is more even for this application.
- Place on a wire rack over a sheet pan. The wire rack elevation is not optional — it allows hot air circulation under the steak, ensuring even heating on all surfaces. A steak resting on a flat pan receives bottom heat via conduction, not convection, and the bottom surface heats more aggressively.
- Insert a probe thermometer into the geometric center, avoiding bone and fat pockets. Bone conducts heat differently from muscle; probe placement adjacent to the bone will read warmer or cooler than the muscle center and give a false reading.
- Pull at 47–48°C for a medium-rare target of 54°C. The oven phase builds a gentle carry-over — typically 3–4°C over the rest period — and the subsequent brief sear adds another 1–2°C to the outer layer without meaningfully raising the core.
- Rest uncovered for 8–10 minutes on the rack or a warm plate. The rest is not merely for moisture redistribution — it is the surface-drying window. The oven has already desiccated the surface partially; the open-air rest completes it. Press the surface after 8 minutes: it should feel dry, slightly papery, not tacky.
- Sear at maximum heat, 60–90 seconds per side. Cast iron or carbon steel preheated until smoking. A thin film of refined avocado oil or beef tallow (high smoke point). Butter, garlic, and thyme in the final 30 seconds.
| Cut | Oven Time at 110°C | Pull Temperature | Final Sear |
|---|---|---|---|
| 2.5 cm ribeye | 15–18 min | 47–48°C | 60 sec/side |
| 3.5 cm ribeye | 20–25 min | 47–48°C | 60–75 sec/side |
| 4 cm tomahawk | 28–35 min | 47–48°C | 75–90 sec/side |
| 4.5 cm porterhouse | 35–40 min | 46–47°C | 75 sec/side |
| 5 cm+ bone-in prime rib portion | 40–55 min | 45–46°C | 90 sec/side |
Pro tip: After the oven rest, press your finger firmly against the steak surface. It should feel dry and slightly papery — not tacky, not moist, not yielding. If it is still tacky, extend the rest by 3–5 minutes in open air. A tacky surface entering the searing pan will steam briefly before browning — you lose 15–20 seconds of the crust window.
The Dry Surface Advantage: Why This Beats Sous Vide on Crust
This is the feature that distinguishes reverse sear from sous vide on crust quality — and why many professional kitchens prefer reverse sear for the highest-stakes steak service. During the 25–35 minute oven phase, the surface of the steak dries continuously. Moisture evaporates from the outer 2–3 mm progressively, in a warm environment that accelerates evaporation without cooking the surface. By the time the 8–10 minute post-oven rest is complete, the surface is measurably drier than anything achievable by patting alone.
When this desiccated surface hits a screaming-hot cast-iron pan, there is almost no moisture left to evaporate first — the energy goes directly into Maillard browning chemistry. The reaction begins within seconds of contact. The result is a deeper, more even, more aromatic crust achieved in under 90 seconds of pan time, compared to the 90–120 seconds needed for a sous-vide surface that had to be dried from a wet baseline.
A reverse-seared tomahawk carries a crust that is visually darker, more even, and more deeply flavored than a conventionally seared equivalent — and the effect is reproducible, not a lucky outcome. The porterhouse, which presents the challenge of two different muscle groups with different fat contents and different surface geometries, benefits particularly: the oven phase heats both the strip and tenderloin portions evenly, and the final sear is so brief that neither muscle has time to overcook relative to the other.
Smoked Reverse Sear: The Steakhouse Variation
Replace the oven with a low-temperature smoker or kamado at 90–110°C and the core technique is identical — but the steak absorbs smoke flavor during the long, low-temperature phase in a way that is impossible in any other steak preparation. Smoke penetrates more deeply at lower temperatures and longer exposure times; a brief post-sear smoke environment (if used at all) adds only superficial char character. The result — called the "smoked reverse sear" on premium American steakhouse menus — combines the textural precision of reverse sear with a deep, integrated smoke character. Cherry, apple, or pecan wood are the standard pairings for beef at this temperature range; mesquite is too aggressive and overpowers the meat's own flavor at extended durations.
For a ribeye or new_york_strip, 45–60 minutes of smoke at 100°C followed by the standard rest-and-sear finale integrates smoke throughout the meat rather than applying it superficially to the surface.
The Cold-Start Pan Variation
For thinner cuts (2–2.5 cm) where oven setup is impractical, the cold-start pan method mimics the reverse sear principle at smaller scale. Place the steak in a cold, unpreheated cast-iron pan, then raise the heat from cold to medium-high over 10–12 minutes, flipping every 2 minutes. The gradual thermal ramp heats the interior progressively before the surface temperature climbs to searing intensity, producing better edge-to-edge doneness than a conventional hot-pan start — without any oven, any rack, or any setup. The crust quality is inferior to a proper reverse sear (the surface never fully dries as it would in a low oven), but the interior uniformity is meaningfully improved. For a hanger_steak or flat_iron, this is the correct method.
The Bottom Line
Reverse sear solves the grey-band problem structurally: it brings the interior to temperature gently and uniformly before the surface is ever exposed to searing heat, so the final crust develops on a foundation that cannot overcook further. The dry surface advantage over sous vide is real, reproducible, and visible in the finished steak. For thick, premium cuts — a bone-in ribeye over 3 cm, a tomahawk, a thick-cut porterhouse — it is the most powerful method available without specialized equipment, and the one that delivers the most consistent high-quality results in a home kitchen.